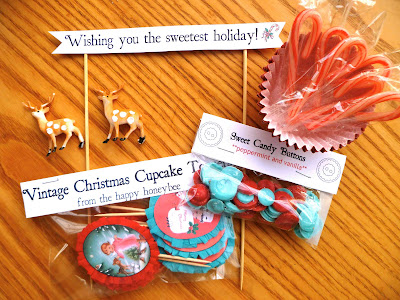
Our first swap was a holiday themed lucky parcel. My partner HoneyBunny is a really creative cook (she shared a delicious recipe for clam-stuffed shrimp with me recently that is now one of our favorites) so I was looking forward to making something for her. Since she is a fan of vintage, I thought it would be nice to make toppers that looked very old-fashioned using images from vintage Christmas cards.
I really like how they turned out, since the crinkly tissue paper adds to the impression that you might have just found them in a box in the attic somewhere. Except they're much less dusty and iffy for your dessert table.
If you'd like to make your own, I've posted a simple tutorial below and uploaded a copy of the cupcake topper images as a pdf here. Just be sure to use them for good (your own personal use) not evil (commercial use), please!
Vintage Holiday Cupcake Toppers Tutorial
Materials & Tools:
1 sheet of vintage holiday images
scissors
tape
1 sheet of tissue paper in a coordinating color
glue stick
blank cardstock ovals
Directions:
1. To make the cupcake toppers, print out a copy of the vintage holiday images onto cardstock and cut around them.
2. Center a toothpick with approximately a third of the stick on the back of the each topper and firmly tape it in place. Smooth out air bubbles with your fingers and make sure it's fastened tightly.
3. Fold tissue paper a few times and cut into long 1/4 inch strips.
4. Flip your toppers over and working from the back, accordion-pleat the tissue strips around the edge of the cardstock. Carefully tape them down every inch or so, and snip off the excess tissue when you reach the end.
5. Cut cardstock ovals of approximately the same size as the vintage images. Using a good glue stick, cover the plain ovals with paste and place onto the back of each topper. Firmly press into place with your fingers, taking care to smooth around and above the toothpick.
Voila! Easy peasy craft with very pretty results.
I packaged the toppers up in a glassine bag and also made a little cake banner using the "Wishing you the sweetest holiday" greeting along with two short bamboo skewers. Since it was a lucky parcel, I also included a batch of candy buttons I made using a Bake it Pretty mold, some snowflake cupcake wrappers, a set of "Baked With Love By..." labels, and a few little trinkets and candies for additional decor. I put then everything into a recycled plastic container that I decorated with striped paper and cupcake-themed deco tape. I hope HoneyBunny enjoys her package...and that you'll enjoy making these toppers, too!


link is not working :(
ReplyDeleteOops, sorry about that! I've just fixed the link, let me know if you still have trouble!
ReplyDeleteThese are so cute!
ReplyDeleteJust a quick note to let you know that a link to this post will be placed on CraftCrave today [02 Dec 01:00am GMT]. Thanks, Maria
ReplyDelete